| Category / Domain: | Administration |
| Compatibility SCOL Voy@ger | V 3.5 and superior |
| Update : | 09/2010 |
This module helps secure access to user aliases using a password (with an encryption system).To do so, it uses a data base that contains information related to each alias (login, password, E-mail address, etc.).
The module also manages user registration and the possibility of changing a password or recalling one in case it was forgotten.
The module also allows the definition of various user rights by way of an item (typically used for site administration). An administrative interface allows the dynamic change of these rights.
Associated with thecolorTerm 2.3,
module it is possible to mark a login in a "away" state.
The database used by LoginP4SQLite3 must be compatible with SQLite3 and require the presence of the libsqlite3.dll DLL in the scol\plugins directory. If this library is not present, you must install it before to use this module.
Note that a SQLite3 database is a simply file. All datas can be read directly by any compatible tool. You should protect its access (if datas are criticals). See SQLite documentation for more explanation.
To use an other type of base, see LoginP4 module.
- libsqlite3.dll installation :
Download it if it is not included in your Scol package. Place it in the scol\plugins directory.
Edit the usm.ini file (or right click on the Scol icon in the active task, choose Advanced, then Expert mode).
Add the line (Take care with the caracters spacing in the library's name, the Scol language is very sensitive):
plugin plugins/libsqlite3.dll SCOLloadSQLITE SCOLfreeSQLITE (MS Windows)
plugin plugins/libsqlite3.so SCOLloadSQLITE SCOLfreeSQLITE (GNU/Linux)
Save modifications and relaunch Scol.
- Preperation of the database :
To put in work the LoginP4SQLite3 module, you must use and must put
in place a compatible SQLite3 Database. This database
will contain all relative information about the managed users accounts.
The parameterization and the use of this module are illustrated through
of an example: the pseudonyms and the passwords are managed by a
table named login_table.
The login_table table contains the set of the information for every pseudonym
connection . She is structured like follows (few modifications from LoginP4) :
|
Column name |
Type |
Length |
Blank field allowed |
Default value |
Duplicate allowed |
|
login |
varchar |
20 |
No |
|
No |
|
password |
varchar |
17 |
No |
|
Yes |
|
userName (optional) |
varchar |
20 |
No |
"" |
Yes |
|
E-mail |
varchar |
50 |
Yes |
�� |
Yes |
|
passwordnumber |
numeric |
|
No |
|
Yes |
|
clienttype |
varchar |
20 |
Yes |
�� |
Oui |
|
nbsuccessfullconnections |
numeric |
|
No |
0 |
Yes |
|
nbunsuccessfullconnections |
numeric |
|
No |
0 |
Yes |
|
lastConnectionDate |
varchar |
25 |
No |
�� |
Yes |
|
accountState |
numeric |
No |
1 |
Yes |
Configuration
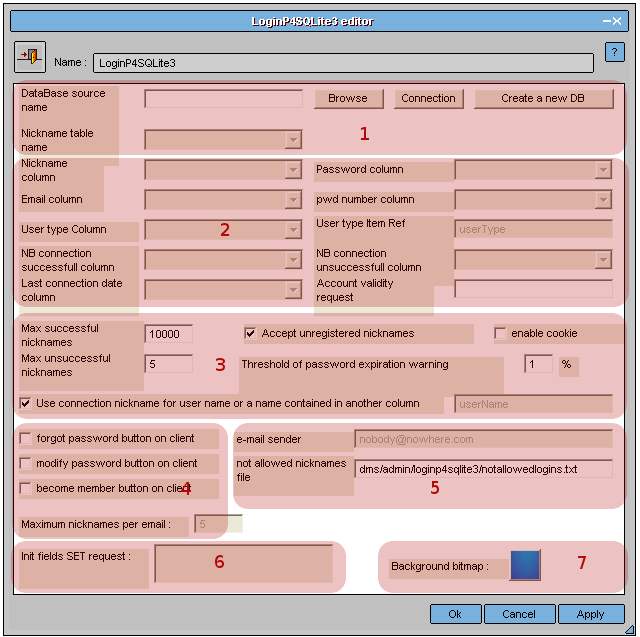
Figure 1 : Interface du module LoginP4SQLite3
| (1) : | Information
contained in area (1) allows the creation of a link with the database that contains secured logins and passwords. It contains 3 fields: -Name of data source -Connection button -Table name containing logins |
|
| Name of data source | Field indicating data base used with module. Database must be a file in a Scol subdirectory. You could press to Browse button to select it. | |
| Create a new database | Create a new database. Its structure is the same as seen above. The new file ust be in a Scol subdirectory. If you want to customize it, you should use an external tool. | |
| Connetion | When the name of the data source is entered, the Connection button establishes a connection between the LoginP4SQLite3 module and the data base. | |
| Table name | A pull-down list indicates the name of tables found in the data base; this field must contain the table name containing information on user logins. In our example, the table name is login_table. | |
| (2) : | Information contained in area � allows the entry of login table column names that the LoginP4SQLite3 module needs. The LoginP4SQLite3 module enables management of various user types. To do so, the module loads the contents of the user type column in the data base in a default customer item called �userType�. Typically, this system will be used for site management. To facilitate integration, two specific events were created: loginChgIsAdmin and loginChgIsNotAdmin. If, for a given user, the user Typer� column is not blank, the �userType� customer item is filled and the loginChgIsAdmin event is triggered. It is then possible to run the event using �userType� item link conditions to activate or deactivate other modules depending on the management level. A loginChgIsNotAdmin event also exists to close management modules whenever an individual with a blank �userTyper� column is connected. It is also possible to use conditions directly on the loginChanged event which is triggered as soon as a user registers, whatever the type may be. |
|
| Login column | Name of column containing aliases (logins). In our example, this column is called login. | |
| Password column |
Name of column containing user passwords (encrypted). In our example, this column is called password. |
|
| E-mail column | Name of column containing user E-mail addresses. In our example, this column is called email. | |
| Password number column | Name of column where a number automatically managed by LoginP4SQLite3 stocks encrypted passwords. In our example, this column is called passwordnumber. | |
| User type column | Name of column defining user types. In our example, this column is called clienttype. | |
| User type item ref. | Specifies client item defining user type. | |
| Nb successful connections column | Name of column in which the number of successful connections since the first connection is indicated. In our example, this column is called nbsuccessfullconnections. | |
| Nb unsuccessful connections column | Name of column in which the number of unsuccessful connections since the first connection is indicated. In our example, this column is called nbunsuccessfullconnections. | |
| Last connection date | Name of column in which the date of the last connection is indicated. In our example, this column is called lastConnectionDate. | |
| Account validity request | It is possible to validate or invalidate user accounts using a parameterable request. By default, no validity test is performed. Example of a validity request: accountState=1. In this case, when a user attempts to connect and the value of the �accountState� column differs from 1, user access will be refused. |
|
| (3) : | Information contained in area (3) indicates site connection limits such as the number of authorized connections for a user, number of unsuccessful connections, etc. When using the LoginP4SQLite3 module for the first time, it is recommended to maintain default values. | |
| Max successful connections | This field is used to parameter the maximum number of times that the password may be validated. Default value is 10,000. | |
| Max unsuccessful connections | This field is used to parameterize the maximum number of unsuccessful connections. Once this number is reached, the customer can only try one more time. If a wrong password is entered, disconnection is automatic. Default value is 5. | |
| Accept unregistered logins | If this option is checked, an alias that does not exist in the data base can be used without a password. | |
| Activate cookies | If this option is checked, aliases and passwords will be stored in a cookie. | |
| Password expiry warning limit | Limit before a warning message appears on the customer screen when connected to indicate password expiry. A value of 1% for a maximum of 10,000 successful connections means that the user will be advised that the password is about to expire when the 9,900th successful connection is attained. |
|
| Use connection login for name or name in another column | Field activated if the option �Accept unregistered logins� is not checked. A different user name can be specified for login entered when connecting in the LoginP4SQLite3 interface and login seen by other site users. | |
| (4) : | Information contained in area (4) helps define customer interface options. Account creation confirmation or recovery of forgotten passwords use E-mail. To do so, the LoginP4SQLite3 module must be linked to the MAIL module using the sendPwdEmail event. | |
| Forgot password button | If this option is activated, a Forgot password button is added to the login entry customer interface. The button allows the user to receive a new password by E-mail./font> | |
| Modify password button | If this option is activated, a Modify password button is added to the login entry customer interface. The button allows the user to modify the password. | |
| Become member button | If this option is activated, a Become member button is added to the login entry customer interface. The button allows the user to register in the data base (password will be sent by E-mail). | |
| Sender E-mail | Sender�s electronic address to send E-mail. | |
| Max logins per E-mail | Used to define the maximum number of possible aliases for a given E-mail address. Once the limit is reached, it will not be possible to create other accounts with this E-mail address. | |
| (5) : | Information contained in area (5) allows management of an alias �black list� | |
| Login files not allowed | In this field, the file access path containing the list of logins not allowed is indicated. (see below) |
|
| (6): | Information contained in area (6) allows start-up of specific fields in the base when creating a user account through the customer interface. | |
| Field initialization request | The request indicated in this field will be executed for each account created through the customer interface. Example: SET accountState = 1 In this case, the accountState field will take on the value of 1 when creating an account. (See previous explanation on Account validity request.)/font> |
|
| (7) : | Finally, area (7) allows the identification of the background bitmap used for the customer interface in the LoginP4SQLite3 module | |
| Background bitmap | This area allows selection of a background bitmap for the customer interface of the module in JPG format. By clicking in the area, the default bitmap can be replaced by a bitmap of your choice. The image must have the following size: 380 x 220 if all options are checked. 260 x 190 if no option is checked. 260 x 220 if the option Accept unregistered logins is not checked, but one or more other options are checked. |
|
# There are two solutions available to create accounts:
- Account creation is automatic: in the customer interface, the user clicks on Become member button. An E-mail containing a password is then sent.
- A new account can be created directly in the data base. Since the password is encrypted, it must be entered through the module administration interface (action editAdmin).
# File of the forbidden pseudonyms:
It is a simple file text that you place in scol\partition directory.
Open this file with your favorite editor and respect the following syntax:
- To every line corresponds a word
- For a chain (login) STRING login
- For a substring (part of a login) : SUBSTRING login_part
Example :
STRING COOLMAN
STRING MYSITE
SUBSTRING ADMIN
The login "nickname" and "mysite" will be forbidden, but not "nick name" or "my site".
In the same way, the login containing "admin" will be rejected: "administrator", "siteadmin",...
# On line, it is possible to have a administration windows:
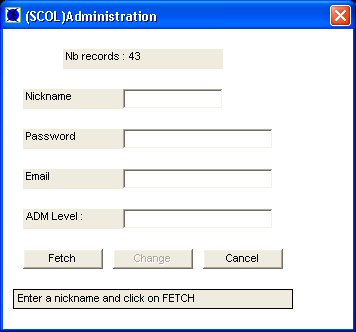
- Nb records : Numbers of nickname in the table
- Nickname : Edit the sought-after login here and click the button Fetch.The other fields will be then
informed automatically according the table's data.
- Password : present password (encoded). It is possible
to edit a new one and validate it with the button Change.
- E-mail : Corresponding email to the nickname. It is possible
to edit a new on and validate it with the button Change.
- Admin level : Niveau d'administration possible pour
lepseudonyme. Il est possible d'en entrer un nouveau puis de valider
avec le bouton Changer.
Note: the words being encoded, it is useless to change the password while editing the login's table.
| Action | Function |
| module.event à LoginP4SQLite3.start | Starts LoginP4SQLite3 module at customer site and displays current login name in the LoginP4SQLite3.text (but not in the login change interface) |
| module.event à LoginP4SQLite3.show | Displays alias entry interface in customer interface.(zone LoginP4SQLite3.login) |
| module.event à LoginP4SQLite3.hide | Hides alias entry interface. |
| module.event à LoginP4SQLite3.destroy | Stops LoginP4SQLite3 module on customer. |
| module.event à LoginP4SQLite3.check | Checks if login/password is correct. |
| module.event à LoginP4SQLite3.editAdmin | Displays an administration interface to change passwords and E-mail of all users. |
| module.event à LoginP4SQLite3.Away |
To link with the event of the same name in the colorterm |
| module.event à LoginP4SQLite3.Back | To link with the event of the same name in the colorterm |
| Event | Function |
| LoginP4SQLite3.in à module Action | Module start-up on customer triggers an action. |
| LoginP4SQLite3.destroyed à module Action | Module stop on customer triggers an action. |
| LoginP4SQLite3.hidden à module Action | Hiding LoginP4SQLite3 module interface on client triggers an action. |
| LoginP4SQLite3.shown à module Action | Display of LoginP4SQLite3 module interface on client triggers an action. |
| LoginP4SQLite3.loginRefused à module Action | Login refused (wrong password, expired login or already used, etc.) triggers an action. |
| LoginP4SQLite3.loginChanged à module Action | Any user alias change triggers an action. |
| LoginP4SQLite3.loginChgIsAdmin à module Action | When the field user type is not blank, it triggers an action (event for administration). |
| LoginP4SQLite3.loginChgIsNotAdmin à module Action | When the field user type is not blank, it triggers an action (event for administration). |
| Zone | Function | Interface | Assignment |
| LoginP4SQLite3.login | LoginP4SQLite3 module interface enabling user to change alias | Client | No |
| LoginP4SQLite3.text | Area where current user alias will appear. | Client | No |